Author – Ashfaq Pathan , Sr.Cloud Engineer
Creating a Robust ETL Pipeline on Databricks with Apache Spark
Azure DataBricks is a data science and data engineering platform that is fast and easy to use, with unlimited applications. It is based on an Apache Spark engine, making it immensely powerful and scalable for incredibly substantial amounts of data. It provides an intuitive environment to collaborate with teammates, to get insights from data which can eventually be used to create visualisations, and all in all, to build and deploy scalable yet efficient models. Lastly, it provides high level of protection and security to the data as it lies within the Azure framework.

It supports most popular languages used for data science and analytics, including Python, R, Scala, Jav a, and SQL. Further, it supports other powerful libraries and frameworks like TensorFlow, scikit-learn, and PyTorch. Therefore, engineers can use skills and tools they have already been using and are comfortable with within Azure DataBricks. This makes it stand out even more, as engineers will find it easy to adapt to Azure DataBricks while improving the quality and efficiency of their solutions.
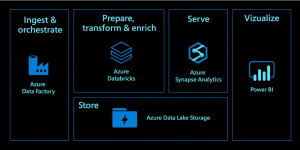
One particular feature of Azure DataBricks that we will be talking about today is its ability to easily integrate with other Azure services, specifically Azure Data Lake and Azure SQL Database. Azure Data Lake is a storage account used for big data analytics, providing scalable and cost-effective options. Azure SQL Database is a relational database service that allows users to perform high-performing, fast queries using the latest version of SQL, without worrying about root-level database management steps like upgrading, monitoring and backing-up data. The potential of Azure DataBricks to work with these other powerful platforms makes it an attractive and compelling product.
Below is a walkthrough of how to get started with the ETL (Extract-Transform-Load) process in Azure DataBricks, and how to make the most of it in order to fit your use case.
- E: Extract Data from Storage Account into Azure DataBricks
Create a Storage Account
First, we need to create a Storage Account within your Azure subscription. Create a resource group, which will be the home to all resources created for this demo. Once this resource group is created, follow these steps to create a Storage Account:
- Go to your resource group > Create > search “Storage Account” > Create.
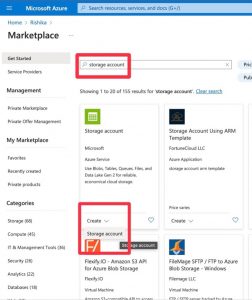
- Choose specifications as shown.
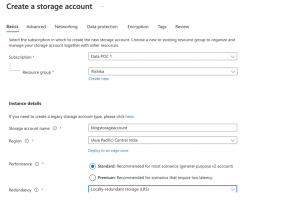
- Under Advanced > Enable hierarchal namespace

- Then click on Review + Create.
Upload data to the Storage Account
To be able to test the connection, we will upload some sample datasets to the Storage Account. First, using the following links, download some test datasets about NYC park squirrels provided by Microsoft.
https://www.dropbox.com/s/268uogek0mcypn9/park-data.csv?dl=0
Next, we will upload it into the storage account.
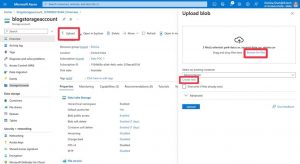
- Go to the storage account resource you created > click “Upload” > upload the files you downloaded
- Create new container and give it a name > click “Upload”
Here is a preview of the data:
Create a DataBricks Workspace
Next, we will create an Azure DataBricks Workspace, using the following steps:
- Go to your resource group > Create > search “Azure Data Bricks” > Create.
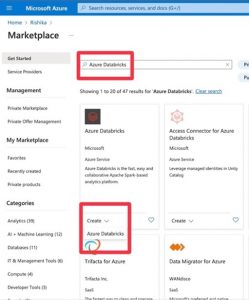
- Choose specifications as shown.
Important: Make sure you choose the same Resource Group as your storage account.
- Then click on Review + Create
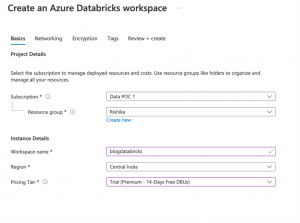
Create a Cluster within the workspace.
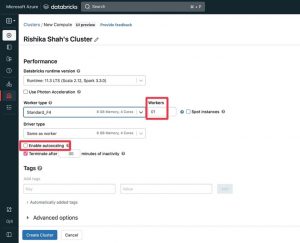
Once the DataBricks resource has been deployed, go to the resource in the Azure Portal and click on “Launch workspace”. This will take you to a new tab, to the Azure DataBricks workspace. Create a Cluster, which is the compute that will run the scripts using the following steps:
- Click New > Cluster.
- Choose specifications as shown.
Important: Disable autoscaling and choose number of Workers as one (since we are currently working with small data)
Create a notebook.
Once the cluster is created, we need to create the notebook.
- Click “Workspace” > Users > Click on your username > Create > Notebook
Establish a connection to the storage account using Access Key
Once the notebook is created, paste the following into the first cell
spark.conf.set(
“fs.azure.account.key..dfs.core.windows.net”,
““
)
- Replace with your storage account name from earlier.
- Replace with the access key, which we will get from the Azure Portal as described below:
Get Access Key
- Go to Azure Portal
- Go to the storage account resource > “Access Keys” on the left panel.
- Copy the “Key” under key1.
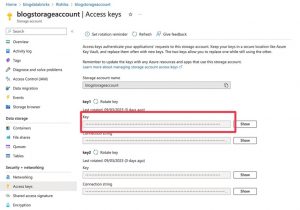
- Paste this key into notebook in the space mentioned earlier in the first cell.
- Return to the notebook for the next steps.
Accessing tables from the Storage Account
In the next cell, paste the following
dbutils.fs.ls(“abfss://@<storage-account-name>.dfs.core.windows.net/”)
- Replace with the container name
- Replace with your storage account name
- For we have 3 options (based on the scope you want to define to be able to access):
- If you created a directory in your container, and want to access all files in that directory, replace it with the directory name.
- If you uploaded files directly into the container without a directory, and want to access only a single file, replace it with the .csv file name
- If you want to access all files in the container, delete entirely. In this case, the code will look something like this:
dbutils.fs.ls(“abfss://@.dfs.core.windows.net/”)
In the next cell, paste the following code
file_location = “abfss://@.dfs.core.windows.net/”
df = spark.read.format(“csv”).option(“inferSchema”, “true”).option(“header”, “true”).option(“delimiter”,”,”).load(file_location)
display(df)
Here, and are the same as before
- Here, must be the name of a file (.csv file), which must lie within the scope defined earlier (container, directory or single file – as per your choice)
Now, df is a PySpark DataFrame which can be used for whatever data analysis and queries as needed.
- T: Transformations on Data
We will perform some transformations on the data next. Below are just some, limited examples of the kinds of transformations that can be done. Python and pandas, of course, support an incredible number of transformations according to what is needed for any given data and problem types.
Before we start performing the transformations, for the purpose of this demo, I converted the PySpark dataframe to a pandas dataframe as it is easier to perform transformations and apply functions to columns in a pandas dataframe. You can choose to keep the data as a PySpark dataframe if you prefer, because eventually when we load the data into the SQL database, it will have to be converted back to a PySpark dataframe.
Converting to a Pandas dataframe:
import pandas as pd
park_pd = park_data.toPandas()
park_pd = park_pd.drop(columns=[“Total Time (in minutes, if available)”])
# dropping this column to demonstrate how this
# transformation can be performed
Below is the code with some transformations:
Finding the total time using start and end time, and save values in a new column called “Time”
from datetime import datetime
def conv_to_dt(dt_string):
return datetime.strptime(dt_string, “%m/%d/%y %I:%M:%S %p”)
def conv_to_string(dt):
return str(int(dt.seconds / 60)) + ” minutes”
park_pd[“Start Time Full”] = park_pd[“Date”] + ” ” + park_pd[“Start Time”]
park_pd[“Start Time Full”] = park_pd[“Start Time Full”].apply(conv_to_dt)
park_pd[“End Time Full”] = park_pd[“Date”] + ” ” + park_pd[“End Time”]
park_pd[“End Time Full”] = park_pd[“End Time Full”].apply(conv_to_dt)
park_pd[“Time”] = park_pd[“End Time Full”] – park_pd[“Start Time Full”]
park_pd[“Time”] = park_pd[“Time”].apply(conv_to_string)
park_pd = park_pd.drop(columns=[“Start Time Full”, “End Time Full”])
park_pd.head()
Create a column called “Dogs Present” which has Boolean values with information about whether dogs were present at the time of data collection.
def dog_present(animals):
if animals:
return “Dog” in animals
return None
park_pd[“Dogs Present”] = park_pd[“Other Animal Sightings”].apply(dog_present)
park_pd.head()
Find number of Squirrels sighted per Sighter.
park_pd[“Squirrels Per Sighter”] = park_pd[“Number of Squirrels”] / . park_pd[“Number of Sighters”]
park_pd.head()
Get Temperature as a Float if available.
import re
def conv_temp(temp_weather):
temp_weather = str(temp_weather)
x = re.findall(“\d\d”, temp_weather)
if x:
return float(x[0])
return None
park_pd[“Temperature”] = park_pd[“Temperature & Weather”].apply(conv_temp)
park_pd.head()
3. L: Load data into an Azure SQL Database
Create a SQL Database and SQL server.
First, we need to create a SQL Database within your Azure subscription.
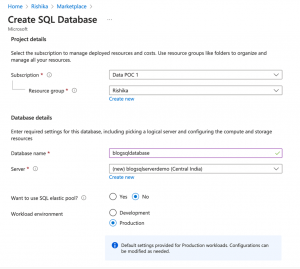
- Go to your resource group > Create > search “SQL Database” > Create
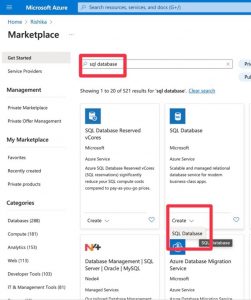
- Choose specifications as shown.
- Go to your resource group > Create > search “SQL Database” > Create
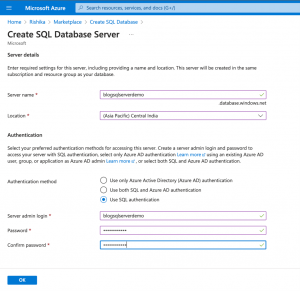
Under Server, click “Create New” to create a new server. Enter the server details as below:

Choose the specifications for the server as shown below. Make sure to choose SQL authentication as the authentication method, and remember to note down the username and password, as you will need it later. Once you’re done, click okay, and choose the rest of the specifications for the database as described later.
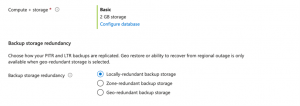
Important: Under “Compute + Storage” for the database make sure to change the configuration to ’Basic’ to avoid large costs

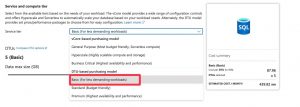
Here are the remaining settings for the database:
Establish a connection with the database.
To get the URL to establish a connection with the database from the notebook, go to the SQL database resource in the Azure portal. Then go to Settings > Connection Strings > JDBC. Copy this Connection string URL which will be used to connect to the database from the notebook.
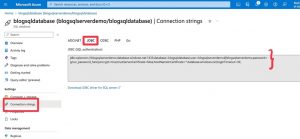
Next, add the following code to the notebook. URL be a variable containing the connection string you just copied from the portal.
from pyspark.sql import *
. url = “jdbc:sqlserver://blogsqlserverdemo.database.windows.net:{port_number};database={sql_database_name};user={your_username}@{sql_server_name};password={your_password};encrypt=true;trustServerCertificate=false;
hostNameInCertificate=*.database.windows.net;loginTimeout=30;”
Start a Spark Session and Convert the pandas dataframe to a Spark data frame.
spark = SparkSession.builder \
.master(“local[1]”) \
.appName(“SparkByExamples.com”) \
.getOrCreate()
sparkDF=spark.createDataFrame(park_pd)
sparkDF.show()
file = DataFrameWriter(sparkDF)
Add a Firewall rule to the SQL server.
We need to add a Firewall rule to allow public access of the server from the notebook. Go to the SQL server resource > Security > Networking on the left panel.
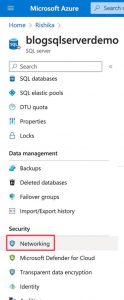
Then, go to Public Access > Selected networks.

Under Firewall rules, click ‘Add a firewall rule.’ Give the rule any name and add your computer’s IP address. Finally, click save to save changes.
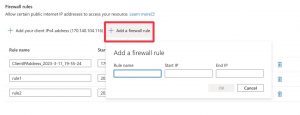
- Hint: if you don’t know your IP address:
Run the code from the next step in your notebook. This code attempts to write to the SQL database. It will give an error message as you have not added the firewall rule yet. However, the error message will contain the IP address. Once you have that, create the rule as explained before and then continue.
Write to SQL database.
Run the following code in the notebook (Here file is the DataFrameWriter object from earlier, and name_of_table is what you want the table to be called in the SQL database):
file.jdbc(url=url, table=”{name_of_table}”, mode=”overwrite”)
Check the SQL database to see if the table has been added.
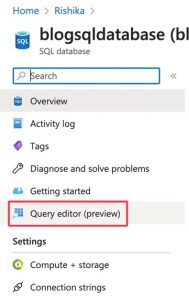
Go to the SQL database resource > Query editor (preview). Then go to Tables and click on the dropdown. You should see a table with the name you gave it.
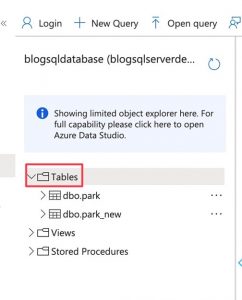
To look at the contents of the table, run the following query in the editor:
select * from {name_of_table}
Here is the preview of the data:
Conclusion
In this blog we have been able to demonstrate the ETL process using Azure Data Lake, Azure Data Bricks, and Azure SQL DB. All the services work well in conjunction with each other. We are able to load data into the Storage Account, perform any kind of transformations in DataBricks, and finally query the data the SQL DB. Eventually, this data can be used for a multitude of purposes, like creating Machine Learning models and visualisations in PowerBI. What makes Azure the perfect tool for this process is the fact that each service specialises in a different function (storing, cleaning, transforming and querying), and that each of the services can be used efficiently and intuitively with each other.


